
2. The ship
Create the Player object
Section titled “Create the Player object”An object is a kind of thing in the game. The object Player is the player’s ship.
-
In the Recursos (Resources) panel, right-click the
objectsfolder and choose Novo objeto… (new object). Name itPlayer. -
Select
Player. In the Inspetor (Inspector), under Aparência (appearance), choose the spritenave. -
In the Variáveis (variables) section, click + Variável and choose número (number). Click the name, change it to
velocidade(speed), and set the value to2. It is the speed of the ship, in pixels per step.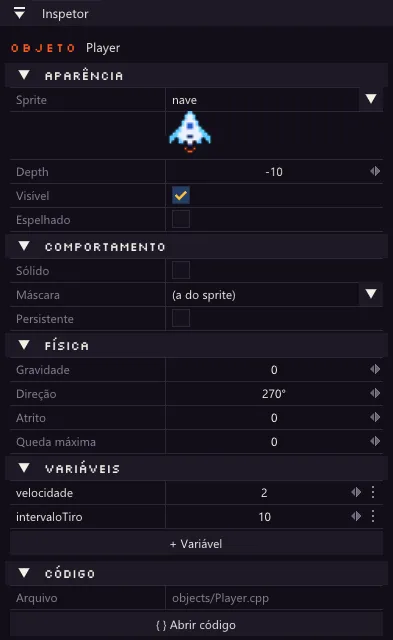
A variable is a named value you adjust here, in the editor, and use in the code. To make the ship faster later, just change this number: there is no need to touch the code. See Variables.
Place the ship in the room
Section titled “Place the ship in the room”-
Open the room
Main(double-clickMain, in theroomsfolder). -
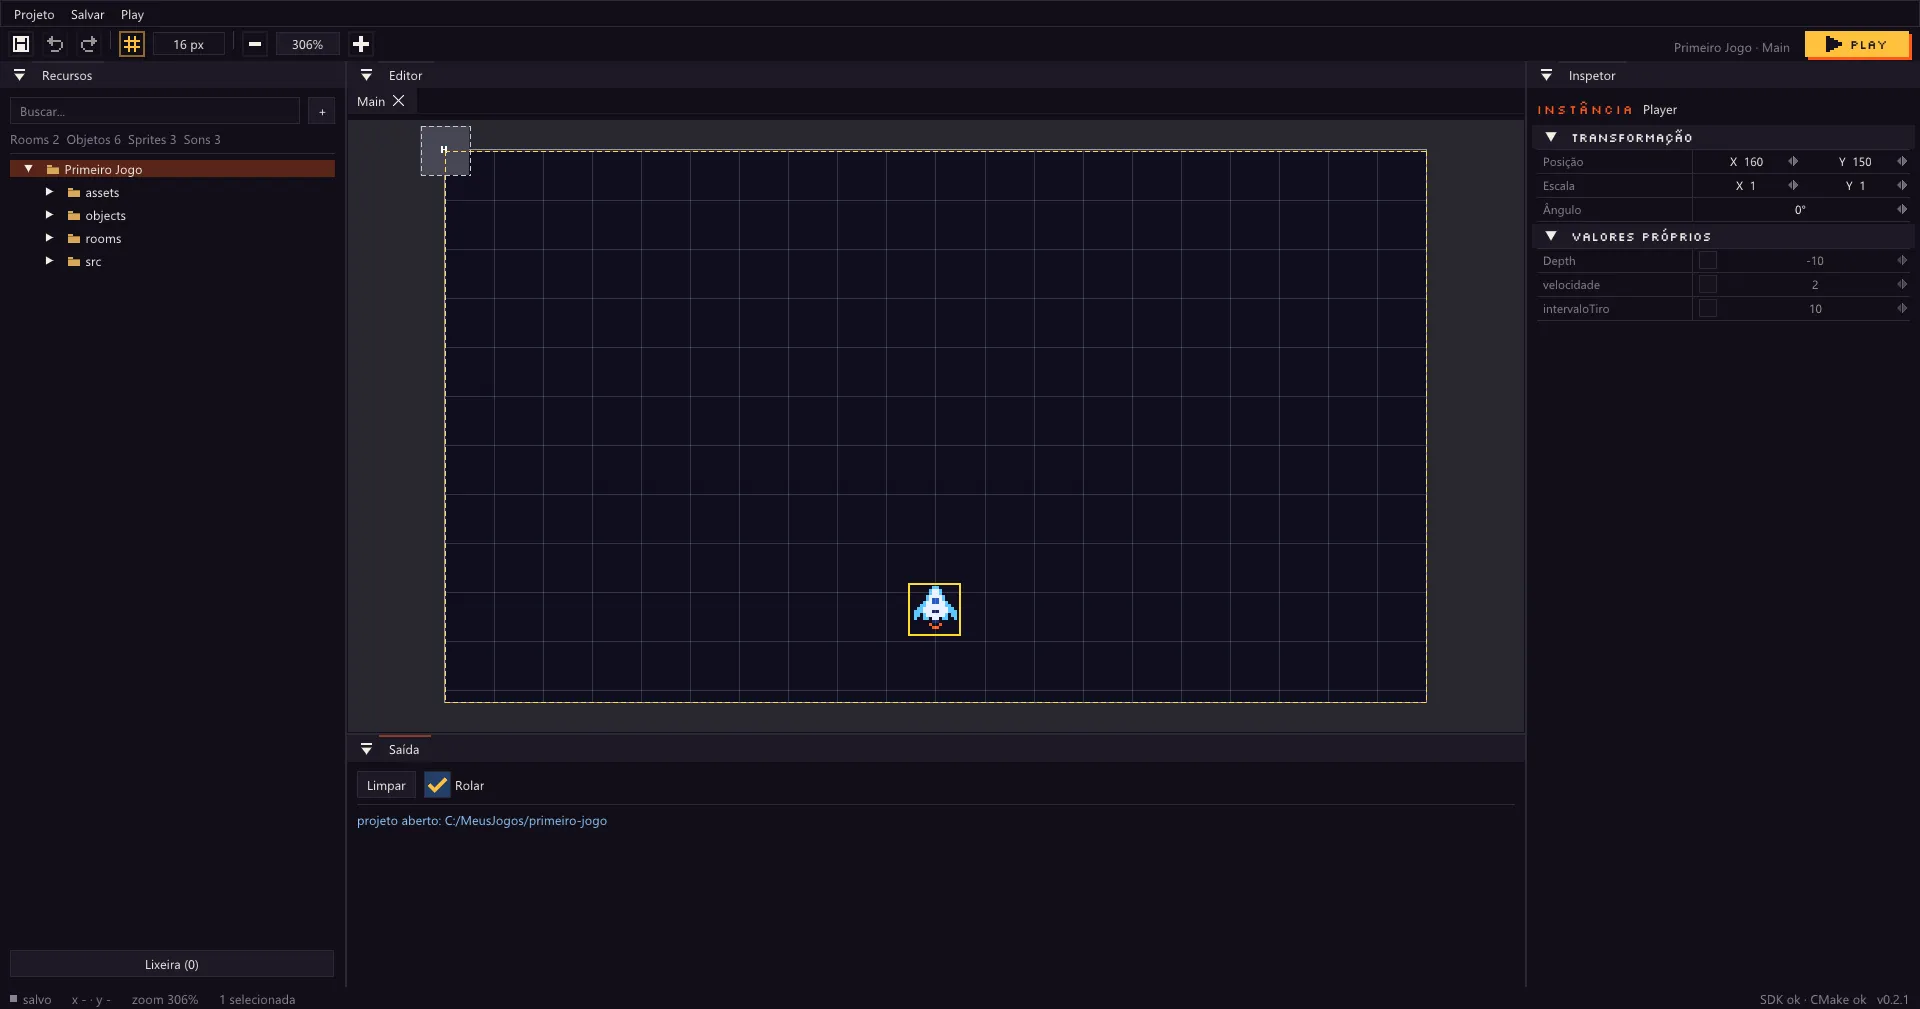
Drag
Playerfrom the Recursos panel into the room, near the middle of the bottom part. -
With the ship selected, the Inspetor shows its position. In Posição (position), set X =
160and Y =150. Drag the number or double-click to type.
The two files of the object
Section titled “The two files of the object”Each object of the game becomes a class in C++. When you created Player, Brasa created two files for it, in the objects folder:
Player.hppsays what the ship has: the events it uses and the data it keeps;Player.cppsays what it does in each event.
Open the little arrow next to Player, in Recursos, and double-click Player.hpp. It opens in your code editor, with some examples. Delete everything and write:
#pragma once#include <brasa/brasa.hpp>
// The ship. velocidade is a variable of the object: change it in the Inspector, without touching the code.class Player : public brasa::Entity {public:    BRASA_VARS(Player)
void onSpawn() override; void onUpdate() override;};Make the ship move
Section titled “Make the ship move”Now open Player.cpp (in the object’s Inspetor, { } Abrir código, open code). Delete everything and write:
#include "Player.hpp"
#include <algorithm>
using namespace brasa;
void Player::onSpawn() {    animSpeed = 0.2f;  // the engine flame alternates between the 2 frames}
void Player::onUpdate() {    // The actions are in the project settings (keyboard and gamepad).    // axis returns from -1 to 1: -1 = the first action, 1 = the second.    float dx = axis("esquerda", "direita");    float dy = axis("cima", "baixo");    if (dx != 0.0f && dy != 0.0f) {  // on the diagonal, it moves at the same speed        dx *= 0.7071f;        dy *= 0.7071f;    }
    // clamp keeps the ship inside the screen (the ship is 16 px, so the margin is 8).    const float maxX = static_cast<float>(roomWidth()) - 8.0f;    const float maxY = static_cast<float>(roomHeight()) - 8.0f;    x = std::clamp(x + dx * velocidade, 8.0f, maxX);    y = std::clamp(y + dy * velocidade, 8.0f, maxY);}
BRASA_ENTITY(Player);
What each part does:
#include "Player.hpp"brings in the class you just wrote.Player::onSpawnruns once, when the ship is created.animSpeed = 0.2fmakes the animation advance 0.2 frame per step, that is, it changes frame every 5 steps. (If the sprite has an fps set in the editor,animSpeedmultiplies that fps instead: see Animate a sprite.)Player::onUpdateruns on every step, 60 times per second. It reads the commands and moves the ship.axis("esquerda", "direita")returns-1with the actionesquerda(left),1withdireita(right) and0with neither.dxanddykeep where the ship wants to go.- On the diagonal, the ship would move faster (the two directions add up). Multiplying by
0.7071fixes that. xandyare the position of the ship.velocidadeis the variable you created in the Inspector.std::clamp(value, minimum, maximum)holds the value inside the limits, androomWidth()androomHeight()give the size of the room. That way the ship doesn’t leave the screen.BRASA_ENTITY(Player);registers the class with Brasa. That is how the objectPlayerin the editor finds your code.
What the actions are
Section titled “What the actions are”esquerda, direita, cima (up) and baixo (down) are actions: names tied to keys and to gamepad buttons. A new project already comes with them, working for the arrow keys, for WASD and for the D-pad and the stick of a gamepad.
To see or change them, open Projeto › Configurações do projeto… (Project › Project settings) and look for Ações de entrada (input actions). Because the code asks about the action, not the key, you can change the keys without touching it. See Keyboard and gamepad with actions.
Test it now
Section titled “Test it now”Press Play (or F5). The first time, compiling takes a little longer. The game window opens with the ship at the bottom. Move with the arrow keys or with WASD and watch the engine flame flicker.
Now close the game, change velocidade in the Inspector of Player to 4 and press Play again: the ship gets faster, without you touching the code. Set it back to 2 before going on.
If an error shows up in the Saída (Output), click it: your code editor opens on the line of the problem. Check that the code is the same as above. See also Play and errors.
What you learned
Section titled “What you learned”- Each object has a sprite and two code files: the
.hpp(the class) and the.cpp(what it does). onSpawnruns once, when the object is created;onUpdateruns on every step.- A variable created in the Inspector becomes a value the code uses by name.
axisreads two actions and says which way to go. See Move with the keyboard.xandyare the position of the object, androomWidth()/roomHeight()the size of the room.
Next part: 3. Shots →