
Resources
The Recursos (Resources) panel, on the left, shows everything that exists in your project, in a tree of folders. From here you create, open, organize and drag things into the rooms.
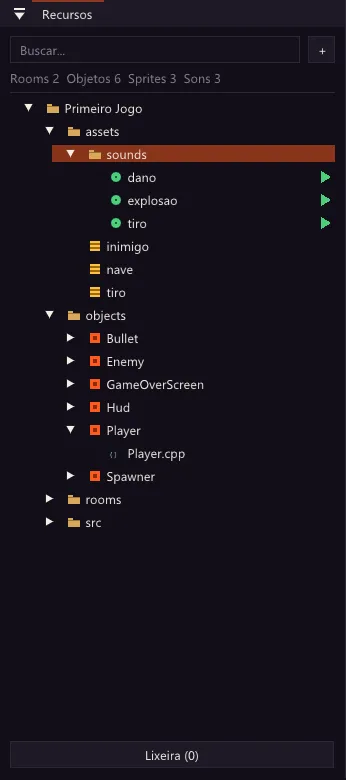
What shows up here
Section titled “What shows up here”| Icon | Type | What it is |
|---|---|---|
| orange square | Object | A kind of thing in the game. Open the little arrow to see its code files (.hpp and .cpp). |
| blue square | Room | A level. The start room shows up as (inicial). |
| yellow lines | Sprite | A PNG image, with frames. |
| green dot and ▶ | Sound | A WAV file. The ▶ plays the sound right away. |
{ } |
Code | Loose .cpp and .hpp files, such as game.hpp. |
At the top, Buscar… (search) filters by name, and the line Rooms · Objetos · Sprites · Sons counts how many of each you have.
The folders are yours: organize them any way you like. Brasa figures out the type of each file by its extension, not by the folder.
Create and import
Section titled “Create and import”Click the + (or right-click a folder) and choose:
- Nova pasta… (new folder, shortcut Ctrl+Shift+N)
- Nova room… (new room)
- Novo objeto… (new object): creates the object with two code files: the
.hpp(the class) and the.cpp(what it does), with commented examples. - Novo objeto (sem código)… (new object, without code): creates only the object’s data, with no code. Good for floor, crates, spikes and decoration. See Objects without code.
- Novo script… (new script): a loose code file (
.cppor.hpp). - Importar sprite (PNG)… and Importar som (WAV)… (import sprite, import sound)
You can also drag PNG and WAV files from File Explorer into the panel. They go into the selected folder: click the right folder before dragging.
Select and organize
Section titled “Select and organize”- Click to select. Ctrl+click adds more items, Shift+click takes a range and Ctrl+A selects everything.
- Drag items to another folder to move them.
- F2 renames. Enter opens.
- The right-click menu offers Abrir (open), Renomear… (rename), Excluir… (delete), Mostrar no Explorer (show in Explorer) and, on a room, Definir como room inicial (set as start room).
The recycle bin
Section titled “The recycle bin”Delete sends the selected items to the Lixeira (recycle bin), at the foot of the panel. Nothing is lost right away: open the Lixeira to Restaurar (restore) an item or Esvaziar lixeira (empty the bin) for good.
Select an object
Section titled “Select an object”With an object selected, the Inspetor (Inspector) shows:
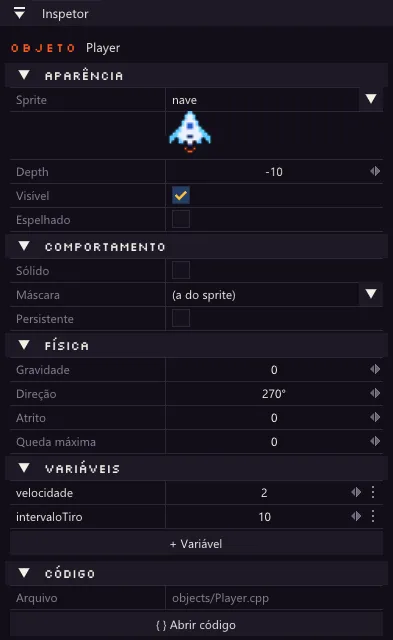
- Aparência (appearance): the Sprite, whether it is Visível (visible) and whether it starts Espelhado (mirrored).
- Comportamento (behavior): Sólido (solid) marks the object as a wall for
moveAndStopandplaceFree; Máscara (mask) and Persistente (persistent) are here too. - Física (physics): gravity, friction and maximum fall.
- Variáveis (variables): values you create in the editor and use in the code.
- Código (code): the object’s file and the Abrir código (open code) button, which opens it in your code editor.
The Inspector page explains each section.
Rename an object
Section titled “Rename an object”When you rename an object (F2), the editor counts how many places in its .hpp and .cpp use the old name and asks whether to change them. Only the object’s own files are rewritten: if another object mentions that name, fix it there by hand.
Files changed from outside
Section titled “Files changed from outside”If you change the project’s files with another program (VS Code, Aseprite, Git), Brasa notices and reloads by itself. The Saída (Output) tells you what was reloaded. If you have unsaved changes in the same file, it asks first.